
Plane Talk: Pacific Aeromodel Clip Wing Monocoupe ARF
Allan Poinsett
A 25%-scale sport model of the legendary hop-up
THE STANDARD full-scale Monocoupe (the Model 90) was designed to compete with the Piper Cub. It was powered by a 90-horsepower radial engine, and it offered a little more performance and much more luxury than the Cub. To offer a bigger performance advantage, the factory later added a 110-horsepower radial and called that version of the Monocoupe the Model 110.
The Model 110 Special, a clipped-wing version of the 110, grew out of racing pilot Johnny Livingston’s desire to have a faster aircraft for the National Air Races. He asked the factory to shorten the wingspan from the standard 32 feet to 20 feet, reduce the size of the tail, and install a large 145-horsepower radial engine.
The factory shortened the wingspan to just longer than 23 feet — the minimum it felt was sufficient to sustain safe flight during high-speed pylon turns. The changes improved the speed from 150 mph to 220 mph, and Livingston won many races with the aircraft in the late 1930s and early 1940s.
Modified civilian aircraft were no longer competitive after World War II, with all those surplus warbirds, but they were still prized for their aerobatic abilities. A clipped-wing Monocoupe won the first International Aerobatics Championships in 1948, and clipped-wing Monocoupes were featured performers in air shows until the 1970s.
A total of 10 110 Specials were built before Monocoupe shut down, the factory built or modified seven, and three were modified by their owners. Private individuals have built several more in the years since then, and quite a few are still flying today.
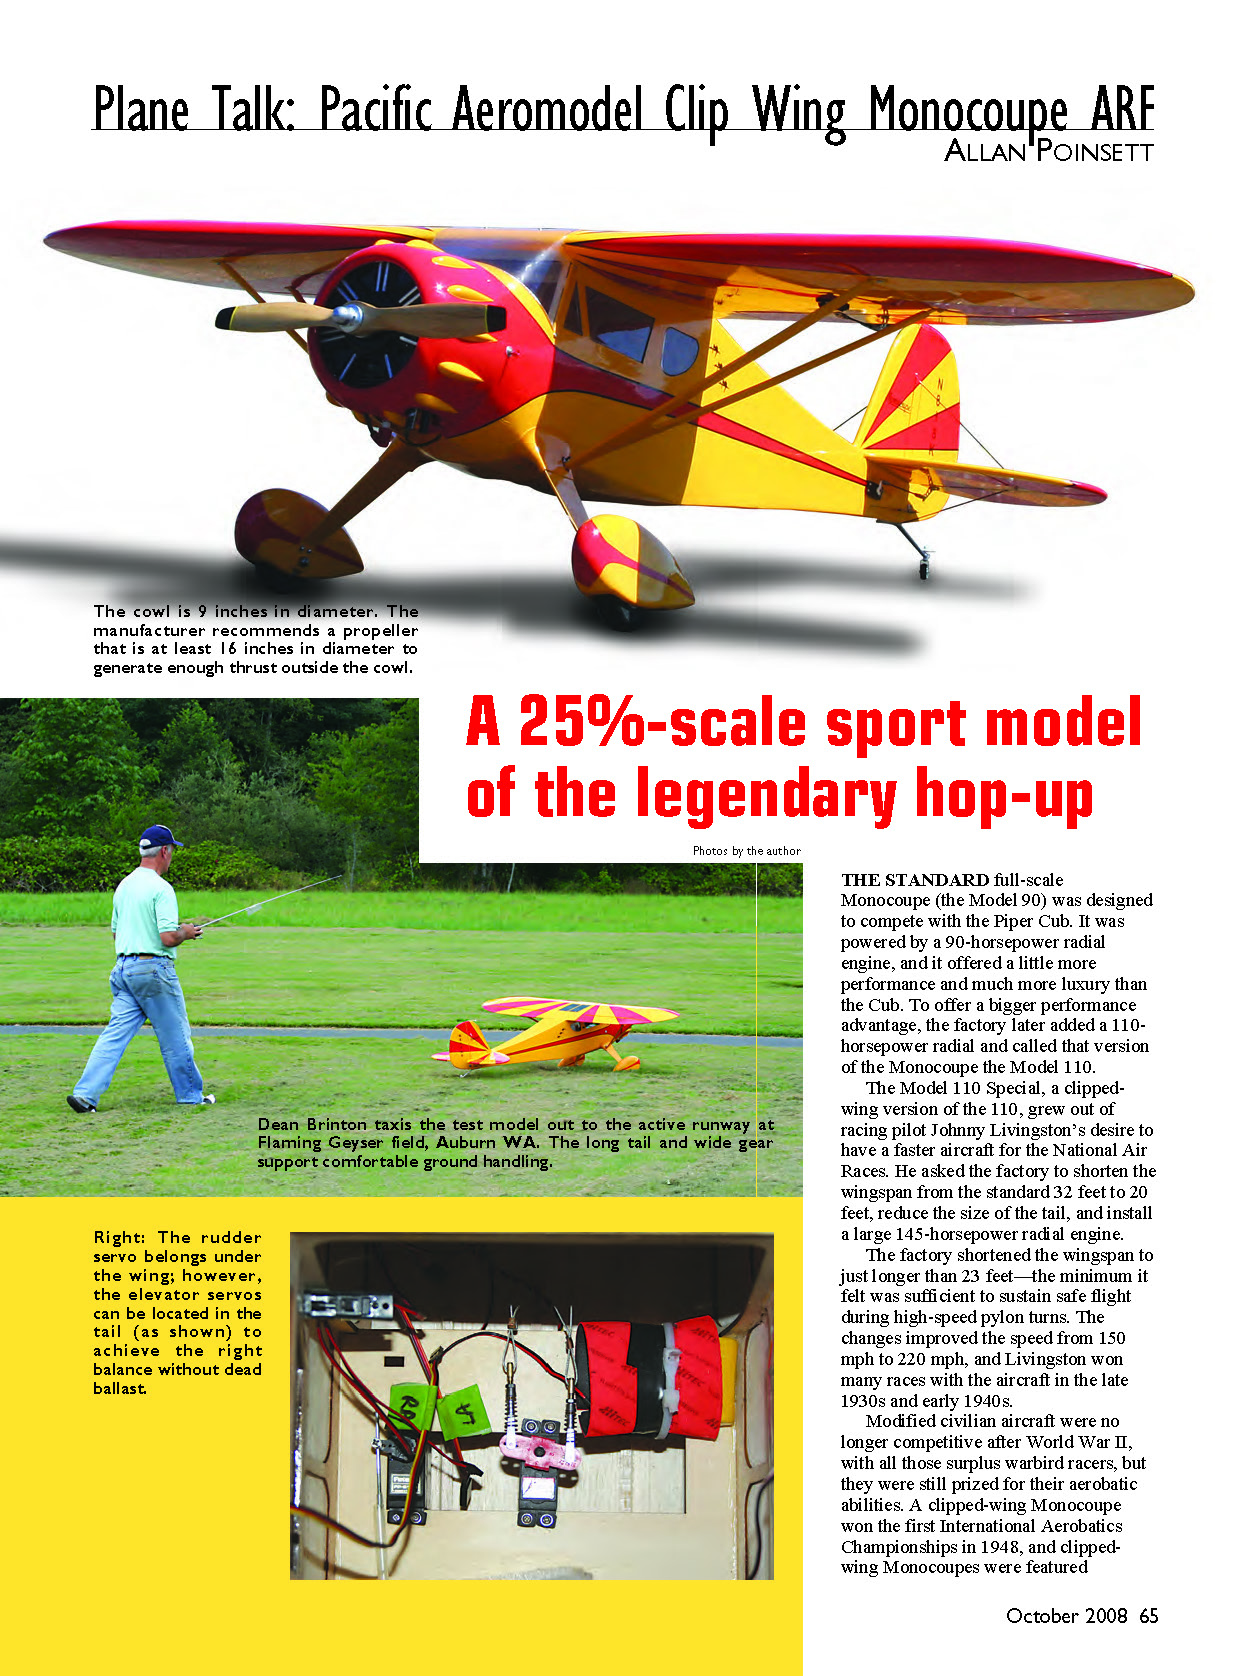
Pacific Aeromodel's 25%-scale ARF version of this tough-looking little airplane caught my eye. The UPS person delivered the 55 x 18 x 15-inch box that weighed 18.5 pounds, and it showed no scars.
Inside the shipping container, the model was creatively packed to minimize shipping damage and the parts were individually bagged in the usual plastic wrapping. The first thing that struck me was the beautiful finishing job in a Cub Yellow-and-True Red color scheme.
On top of everything was an instruction manual; it was 27 pages long (for an ARF!).
Specifications
- Model type: Sport-scale ARF
- Skill level: Intermediate builder, intermediate pilot
- Wingspan: 69.5 inches
- Wing area: 950 square inches
- Length: 63.5 inches
- Weight: 12.5-14 pounds
- Wing loading: 32 ounces/square foot
- Engine: .120-.180 (glow), 25cc-35cc (gas)
- Radio: Four channels with six servos
- Construction: Balsa and light plywood, fiberglass cowl and wheel pants
- Covering/finish: Three-color iron-on film, polyurethane paint
- Price: $429.95
written in American English and complete with 55 color photos. I had to look through this.
I am usually a "grab parts and start sticking them together" builder, and I have constructed more than my share of kits and ARFs. But after a half hour with this book, I began to understand that some of the assumptions I might have made would have led me far astray.
Someone who is obviously a seasoned modeler wrote the instructions clearly and precisely. The book contains an inventory of all parts and step-by-step directions. The instructions are illustrated at every turn, so I will not go through them for this review.
If you choose to build this Monocoupe, the manual will guide you through assembly and setup. This is a fairly sophisticated model, and the assembly process in the instructions needs to be followed to ensure that the result is an easy build and the best flight characteristics.
Construction: The first step was to reshrink the covering. I couldn't find a bubble anywhere in the covering when I opened the box, which is unusual for the distance the kit travels. I went over the entire kit with a Top Flite MonoKote Hot Sock-covered iron anyway, using a medium setting. Later I found that a few edges and seams had come up, but that was no problem; they ironed back down easily.
You must prepare the hinge-point-style hinges, which are installed at the factory but not glued. I lubricated the hinge joints and installed them using Pacer hinge glue, making sure that all the hinges were parallel to each other and perpendicular to the line of the control surface as illustrated in the manual. The resulting control surfaces were free from binds and had tight hinge gaps.
A neat tip I hadn't thought of before is to apply the Monocoupe and N-number stickers before assembling the tail feathers. That is much easier to do on a flat surface.
The Hitec HS-425BB servos fit easily into the wings, and routing the leads was easy. You don't really need the pull-through strings, but they are there.
Illustrated steps show you how to install the aileron pushrods (read the addendum; the original ones have been replaced), install the control horns (all of nice quality), and put in aileron differential mechanically if you don't have a computer radio. Aileron differential is a must with this model.
I chose to use a Zenoah G-26; one of two engines the manual shows is installed. The other is a Saito 1.80 four-stroke.
With the Zenoah, you must stand off the motor 7/8 inch from the firewall. I bought a length of 1-inch hardwood dowel and ran it through the band saw a bit oversized. Then I faced the four pieces square on one end and matched the four pieces and reduced them to the 7/8-inch dimension. I wanted to ensure that the standoff didn't alter the thrust offset built into the firewall.
The vertical and horizontal centerlines for mounting the engine are scored on the firewall. After carefully measuring the position of the Zenoah's mounting holes and transferring them to the firewall, I drilled the required holes in the firewall to suit the 1 1/4-inch bolts with blind nuts. I had no problems getting it right the first time.
Test-Model Details
Engine: Zenoah G-26
Propeller: APC 17 x 6
Tank capacity: 15.2 ounces (gas)
Radio system: Hitec Eclipse 7 transmitter; Hitec Supreme 11S eight-channel FM receiver; five Hitec HS-425BB servos; one Hitec HS-475BB servo on the rudder; 1800 mAh, 4.8-volt battery
Ready-to-fly weight: 13 pounds, 4 ounces
Flight duration: Exceeds 10 minutes
Pluses and Minuses
+ Two-piece wing. + Included dummy engine/cooling baffle. + Extremely high-quality kit. + Quality 4-40-size hardware included. + Quick and easy field assembly.
- None noted.
As you are preparing to work on the front end of the fuselage, you get to remove the factory-installed windshield and top fuselage hatch cover. Since the side windows are not installed, there is plenty of room for large adult-size hands (such as mine) to delve into the fuselage cavity.
A good-quality fuel tank is provided, along with the parts needed for use with either glow fuel or gasoline. A number of photos show how and where it should go.
In a short time I had the tank assembled and installed and the fuel lines, kill switch, and choke lever mounted and connected to the engine. An addendum to the instruction book provided replacement fuel-tank lines and brass fuel-tank tubes. The addendum describes what to replace and why to replace it.
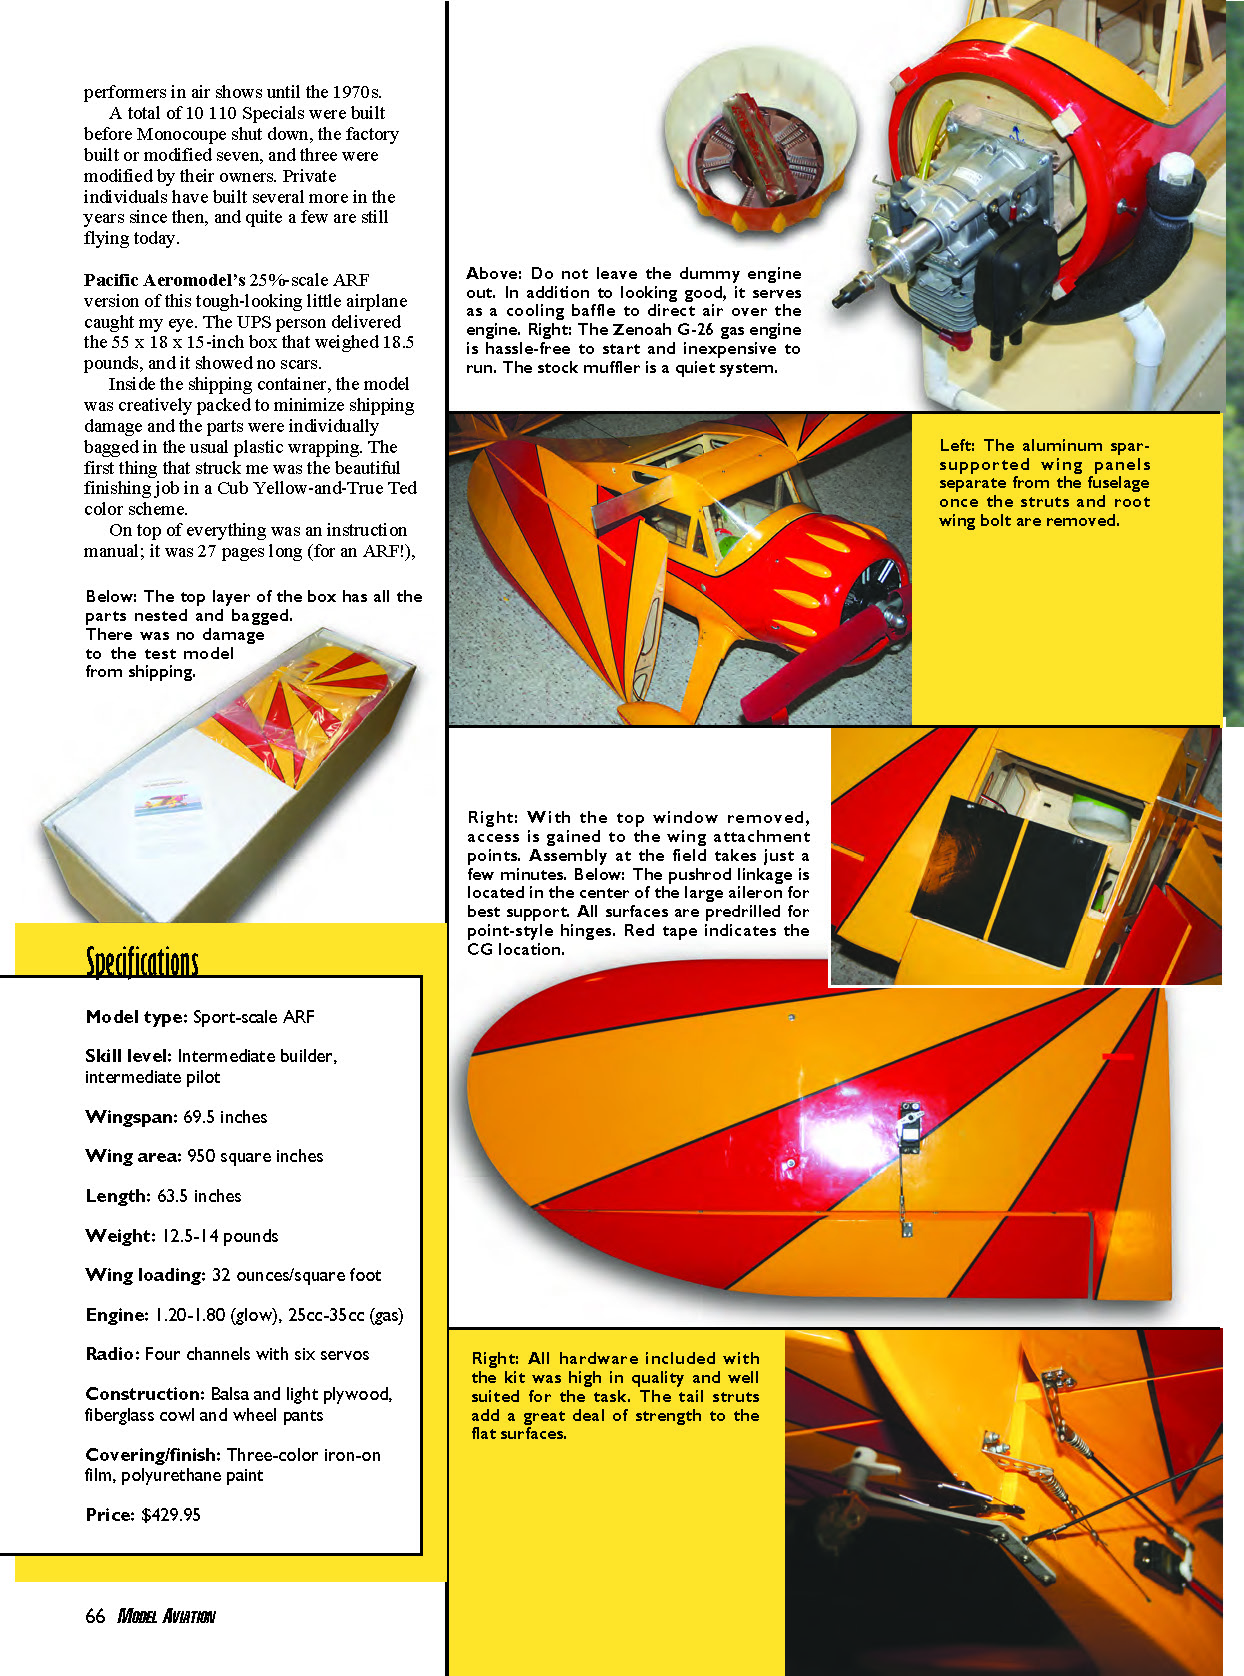
The cowl is a beautiful piece of fiberglass, painted in two colors. It is accompanied by a dummy engine, which is also nicely prepainted. The illustrated instructions show how to position and install the dummy engine in the cowling. Cut out a portion of the lower dummy engine to allow for cooling airflow around the inverted power plant.
The dummy engine did not fit well when I slipped it inside the cowling. That caused me to stop and think about getting it glued flush and straight with the crankshaft opening centered inside the cowling.
Going by the manual again, I put the cowl on a flat surface, applied silicone to the contact points on the dummy engine, inserted the dummy engine inside the cowl, aligned it with the bumps on the cowl, weighted it down with a steel block, and left it overnight. Voila! It worked.
I understand that the latest Clip Wing Monocoupe shipment from Pacific Aeromodel has a better-fitting dummy engine.
I certainly didn’t want to cut any more holes in the cowl than necessary, so I was pleased that I had to make only two slots in the bottom to clear the exhaust stacks and the spark plug. I extended those holes to the rear of the cowl to allow me to easily slip the cowl on and off. The whole effect is extremely attractive.
The cooling hole in the dummy engine lines up with the G-26’s cylinder. Seeing the real engine through the hole in the dummy engine, you hardly know it has been cut. Four screws attach the cowl to the prepositioned cowl attach blocks. Make sure there is a gap between the rear edge of the cowl and the fuselage to allow cooling air to escape.
The wings are attached to the fuselage using an aluminum wing joiner. This piece may fit tightly into the wing openings, but inserting the wing joiner into the wing and withdrawing it a few times will loosen it a bit. Do this in a manner that does not place undue stress on the wing itself and later when attaching the wings to the fuselage.
The main landing gear, wheels, and wheel pants are top quality, and they go together easily. Mounting the pants requires no more than slipping them over the wheels and installing two 4-40 screws.
To finish the model, Pacific supplies two fairings that slip over the landing-gear legs and are attached to the gear with silicone. They snub up to the fuselage remarkably well and add a finished look. The paint on the fairings and cowl matches the covering exactly.
Attaching the tail feathers is standard operating procedure. Installing the pull-pull rudder takes the most time, because the cables require custom assembly. All the hardware is supplied, and it appears to be first class. There are detailed photos for you, in case this is the first time you have done this. Mount the tail wheel and the tail braces, and the fuselage is nearly done.
Since I elected to use the heavy G-26, my elevator servos went in the servo mounts in the tail. Pacific also provides elevator-servo mounts in the forward part of the fuselage to help balance a lighter engine and supplies all the pushrods and hardware for both setups. I used a reversing Y harness for the elevators, although I could have used separate channels and mixed them in the transmitter.
Where to cut the covering over the rear servo mounts was obvious, and the servos fit easily. I mounted the receiver on the fuselage sidewall (away from as many wires
By Allan Poinsett
instruction manual illustrates it all.
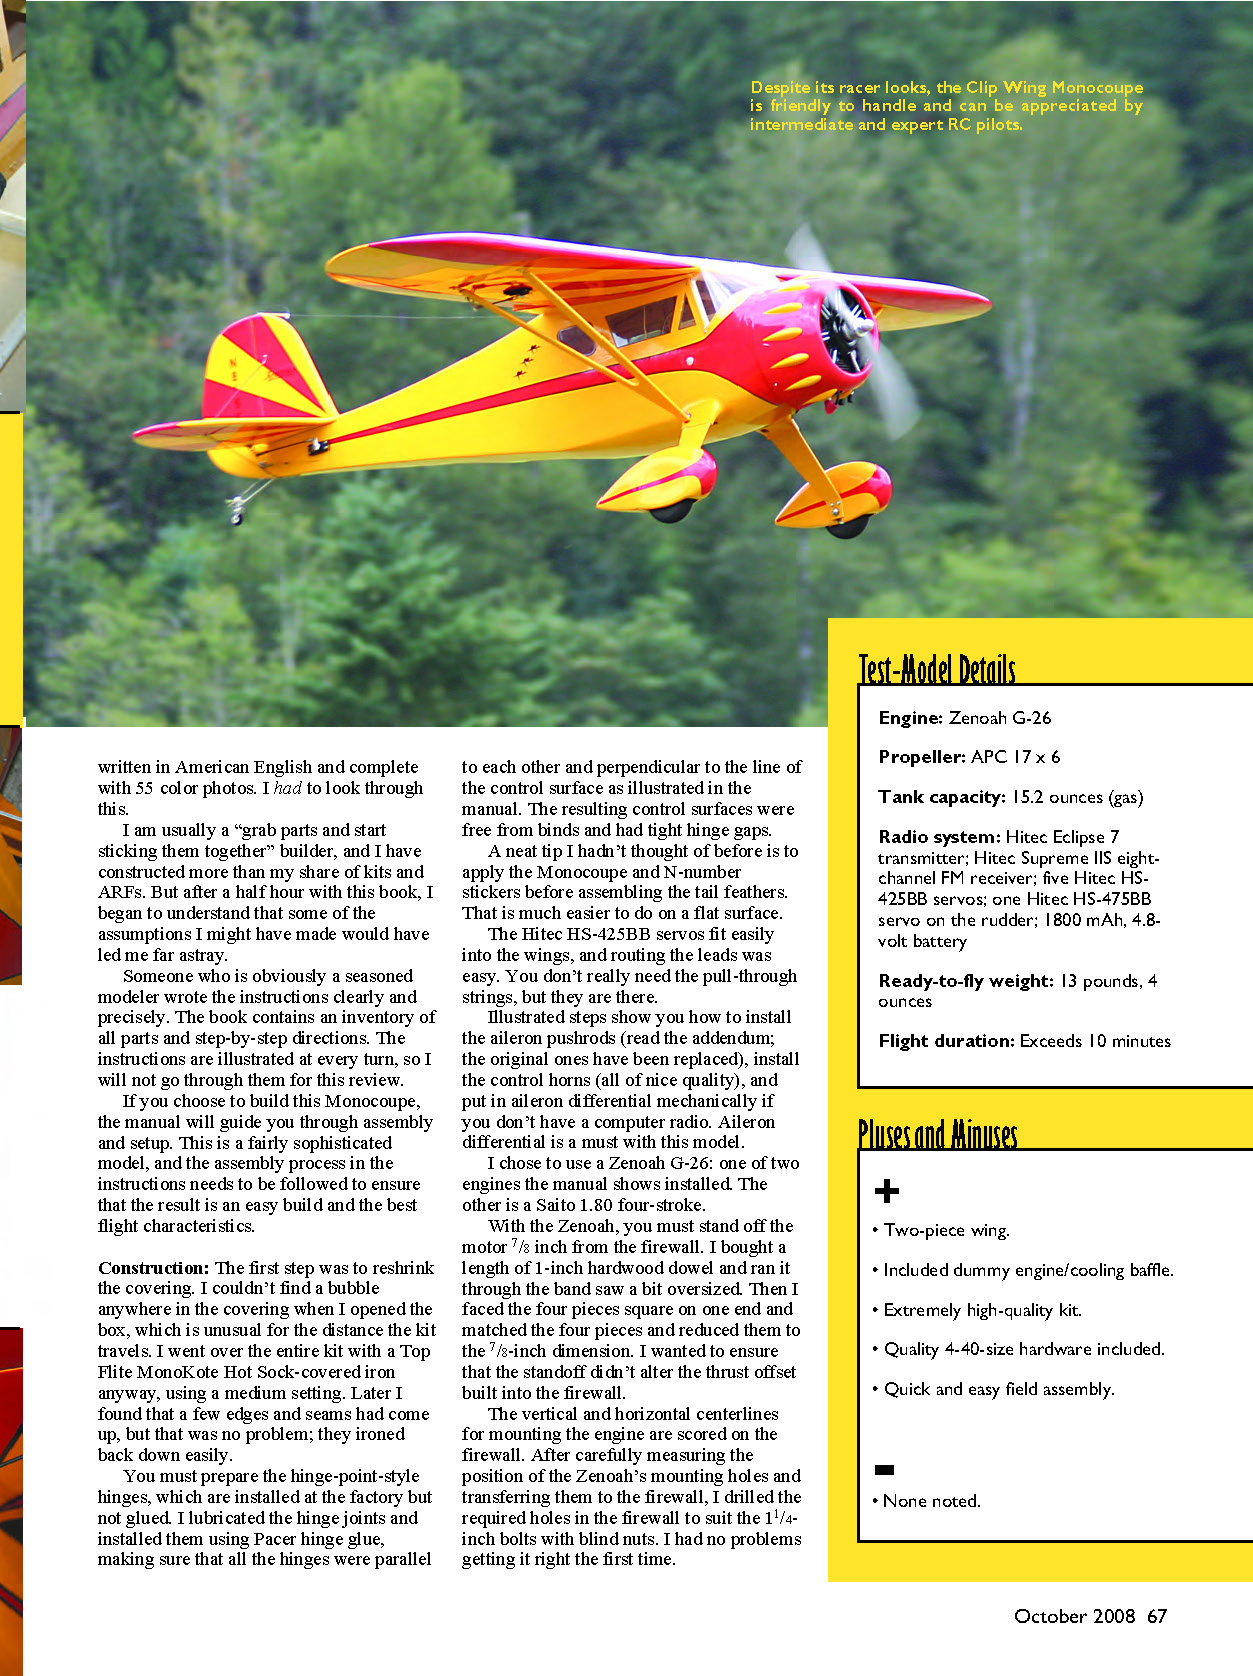
While I was assembling the Monocoupe, a number of my modeling buddies came over and checked it out. All of them were impressed by the model's quality and detail. The only remaining question is, With those short, stubby wings, how will it fly?
The full-scale clipped-wing Monocoupe is fast (the first one was a successful racer) and aerobatic. Another clipped-wing Monocoupe won the first World Aerobatic Championships, but no one has ever said it was easy to fly. Has Pacific Aeromodel been able to tame the beast?
Flying:
On a gorgeous July morning here in the Northwest, we set out for Sanderson Field in Shelton, Washington, to make the Monocoupe's first flight. We spent some time carefully programming all the throw and mixing information into my Hitec Eclipse 7, per the instructions.
We included flaperons and made sure the CG was at the specified point. No additional ballast was required. Field assembly took less than five minutes.
Taxiing with the wheel pants on the slightly long grass runway wasn't a problem. Out on the runway, we were facing a 12 mph breeze. The wind was not gusty but was roughly 20° off the runway centerline. Since this is an abandoned full-scale aircraft runway, we had ample room for maneuvering if it was needed. But the Monocoupe zipped straight down the runway and lifted off with no drama.
My buddy, Dean Brinton, does the flying, and I man the camera for these sessions. He said the model broke ground well in advance of his expectations. No trim adjustments were required. He made approximately four circuits and then did a touch-and-go. No flaperon was used on that first landing. The descent was gentle, and the model remained predictable throughout the approach.
Dean took it back to altitude and ran through a number of loops and rolls. The roll speed at the high-rate recommended setting produced a totally acceptable aileron roll. The G-26 pulled the model through a nice, big loop.
Dean effected a perfect landing on the second attempt, with a three-point that hardly flexed the gear. Since most scale high-wingers require rudder coordination to make a decent turn, we were surprised to find that this one tracks through them wonderfully without rudder. The only time Dean felt that he needed a little (very little) rudder input was in extraordinarily slow-speed turns and when landing crosswind.
After checking to make sure that all the pictures were up to snuff, we spent a day "wringing out" the Monocoupe. Since previous Monocoupe models have not been aerobatic, we tried all the maneuvers for which the full-scale clipped-wing version was famous.
Surprisingly, the model rolled both left and right at the same rate; no torque effects were evident. The rolls were axial and satisfyingly quick at full recommended throws. Loops, both inside and outside, were easy to accomplish.
The G-26 had plenty of reserve power to safely pull the 13-pound airplane through these maneuvers. Snaps were crisp and recovery was immediate. Inverted flight required a small amount of down-elevator, but less than you would expect in a high-wing model.
Spins were realistic and were stopped instantly by just centering the sticks. (Those short wings don't have much rotational momentum.) They were a real attention-getter. It almost makes you think about adding a smoke tank. (There's a great deal of room in the big fuselage.)
The flaperons appreciably slowed the model, with little or no change in pitch attitude. Dean threw in full flaperons on the downwind leg and turned base and reduced power. The model floated down to the runway to a beautiful three-pointer. The wing may be small, but it worked like a charm. Pacific Aeromodel did its homework.
With the vivid color scheme, the Monocoupe is a sight when barreling across the field. The company touched all the bases here. Dean and I felt completely in control at all times.
So did Pacific manage to tame the beast? Definitely! This Clip Wing Monocoupe is easier with which to take off, fly, and land than any Cub we have flown. I don't know how they did it, but it really is a good sport flier.
Once you take the Clip Wing Monocoupe out of the box, you forget all about that short wingspan. It's a giant-scale aircraft you can fly in a spirited way with a large glow engine or a small gas engine. Visit the Pacific Aeromodel Web site for an electric conversion. The looks, quality, and flight performance are top of the line.
When Dean and I were showing off the Monocoupe at our field, almost everyone remarked about its quality, finish, and overall good looks. I got a kick out of the group of members who went over the instruction manual; they oohed and aahed about the prose and the color pictures—especially the detail about assembling the pull-pull cables.
The model flies rock-solidly and looks extremely durable. It's not low-priced, but it delivers more than a fair value for the money.
One thing is for sure: this is not your father's Monocoupe. MA
Allan Poinsett apso4@comcast.net
Manufacturer/Distributor:
Pacific Aeromodel Mfg., Inc. 12368 Valley Blvd. Ste. 109 El Monte CA 91732 (800) 780-0100 www.pacaeromodel.com
Sources:
Horizon Hobby (Zenoah G-26 engine) (800) 338-4639 www.horizonhobby.com
Hitec RCD (858) 748-6948 www.hitecrcd.com
Other Printed Reviews:
Fly RC: April 2008 Model Airplane News: March 2008 R/C Report: January 2008
Transcribed from original scans by AI. Minor OCR errors may remain.

